Monday, May 25, 2009

Crunchy Salad

The carrot is a root vegetable, usually orange or purple, red, white, and yellow in colour, with a crisp texture when fresh.
Carrots can be eaten in a variety of ways. The simplest way of eating is raw carrots, as carrots are perfectly digestible without cooking. They may be even chopped & boiled, fried or steamed, and cooked in soups and stews. A well known dish is carrots julienne (carrot cut into long thin strips).

Well here is the recipe for Crunchy Salad, using carrot juliennes.
Ingredients:

  • 2 carrot, cut into juliennes
  • 1 cucumber, cut into juliennes
  • 1 capsicum, finely chopped
  • 2 tomatoes, finely chopped
  • 1/2 cup boiled corn
  • salt to taste
  • freshly ground black pepper
  • 2 tsp lemon juice

Procedure:

  1. Combine the vegetables & corn in a bowl. Add salt, pepper & lemon juice. Toss and mix well.
  2. Arrange on a serving bowl. Enjoy your crunchy salad..
Making my son eat vegetables is a daunting task, moreover if he thinks bunny is only supposd to eat carrots...My mission was accomplished when he showed interested in having this salad with carrots & corn....

This is going to FIL - April - Carrot event, hosted by Sanghi of Sanghi's Food Delights.

Tuesday, May 19, 2009

Cream of Mushroom Soup

Delicious creamy mushroom soup accompanied with buttered garlic bread, a heavenly treat for a chilly winter's day / night...Adding cream makes this a filling dish....Here's how to make....

Ingredients:

  • 2 cups fresh button mushrooms, finely chopped
  • 1 onion, finely chopped
  • 1 tbsp cornflour
  • 1 tbsp garlic
  • 1 tbsp butter
  • 3 cups water
  • 1/2-1 cup cream, whipped
  • salt (to taste)
  • freshly ground black pepper (to taste)
  • 1 bunch fresh corinader leaves, chopped

Procedure:

  1. Mix cornflour in 1/2 cup cold water (ensure that there are no lumps) and keep aside.
  2. In a microwave safe bowl, microwave butter at 100% power for 30 secs.
  3. Add chopped onion & garlic. Microwave for 2-3 mins at 100% power.
  4. Add chopped mushrooms, salt and pepper and water. Microwave at 100% power for 6 mins. Stir in between (after an interval of 2 mins).
  5. Add the cornflour mixture and microwave at 100% power for 2 more mins.
  6. Add whipped cream and garnish with a spoonful of butter and chopped coriander leaves. Serve hot with buttered garlic toast.
Sending this to the 15 mins cooking, event hosted by Mahimaa of Indian Vegetarian Kitchen...
Also sending the following recipes to the event...

Besan Chillah

According to "ayurveda" all foods are divided into 3 categories "rajasik", "tamasik" and "saatvik". It is believed that the food we eat, decides the quality of our minds and even health of our bodies. Saatvik food consists of lightly cooked vegetables with bare minimum spices, fruits, nuts, honey, milk and milk products. Jain cuisine follows saatvik cooking and certain foods like potatoes, ginger, onions & garlic are strictly prohibited.

Chillah is basically a Rajasthani recipe. I have modified my mother's recipe of soru chakli, a type of pancake prepared with wheat (atta). and she used to call it "gola roti", meaning wheat flour (atta) batter made with water. I changed the dish by adding flour (maida) & besan sometimes adding chopped vegetables.

Here is the recipe for Besan Chillah, good & nutritious and also helps in reducing body fat...Instead of plain roti / chappati, one can take Besan Chillah during lunch / dinner time.

Ingredients:

  • 1 cups gram flour (besan)
  • 1/2 cup plain flour (maida)
  • 1/2 cup wheat flour (atta)
  • 2 cups grated paneer
  • 1 large capsicum, finely chopped
  • 2 bunch cilantro / coriander leaves, finely chopped
  • 2 tsp caraway seeds (shahi jeera)
  • 1 tsp turmeric (haldi)
  • 1- � tsp salt (to taste)
  • a pinch of red chilli powder
  • white oil, for frying
  • water (as per requirement)

Procedure:

  1. Sieve besan, flour & atta. Add turmeric, caraway seeds, salt and red chili powder. Mix well.
  2. Slowly add water and blend to form a smooth batter or until you get the right consistency (ensure there is no lumps, you can even strain the whole mixture once).
  3. Take a non-stick frying pan and heat 2-3 drops of white oil. Spread & coat all over the base with a wooden spatula including the side of the pan. When the oil is hot, reduce heat and pour a ladle full of batter in the middle.
  4. Spread the batter in a circular motion by tilting the pan or by spreading with the back of a wooden spatula to form the chillah.
  5. Sprinkle a little chopped capsicum & coriander leaves and grated paneer on the pancake.
  6. Let it set (you will know when the bottom is set by seeing the colour change).
  7. Flip the chillah to the other side. Add a little oil and toast till done. Repeat with the rest of the batter. Serve hot.

Besan Chillah is going to the following events:

Mango Milkshake

Mango Milkshake, another delectable & refreshing summer drink. As I found out while doing this, there is no fixed measurement and I added the ingredients based on the sweetness of the mangoes and the thickness of the drink....You can also modify as per your wish...Here is the recipe....

Ingredients:

  • 2-3 mangoes / 2 cups cubed mangoes
  • 500 ml / 2 cups chilled milk
  • 4 tbsp sugar (to taste and as per sweetness of mangoes)
  • crushed ice cubes / ice cubes
  • few cubed mangoes, for garnishing

Procedure:

  1. Blend all the ingredients in a blender until mango pieces get crushed to a smooth puree.
  2. Pour in serving glasses. Add ice cubes / crushed ice and chopped mangoes. Serve chilled. Enjoy!!
Tips:
While serving pour a little chilled milk on top. Do not stir. I particularly like the way the milk forms a pattern. You can also add a stirrer while serving.
You can even add whipped cream / vanila ice-cream to have a more creamier milkshake.

Sending this to 15 mins cooking, event hosted by Mahimaa of Indian Vegetarian Kitchen...
Mango Milkshake is also going to the Festive Food: Summer Treat, event hosted by Priti of Indian Khana...
Also sending the following cool drinks to the Festive Food: Sumnmer Treat event...

Monday, May 18, 2009

Hariyali Paneer Tikka

One of my favourite vegetarian items is any paneer dish. I just love to gorge on paneer tikkas, palak paneer, kadhai paneer, matar paneer, paneer pakora, paneer butter masala, yummmm, the list in endless.
Paneer is a basic source of protein for the vegetarians other than lentils. Here is the recipe for Hariyali Paneer Tikka, a vegetarian�s delight & tempting appetizer / snack, prepared with paneer (fresh cottage cheese) and marinated in yogurt.

Ingredients:
  • 500 gms paneer, cubed / diced
  • 1 big capsicum, de-seeded & diced
  • 2 red & firm tomatoes, de-seeded & diced

Marinade:

  • 1 cup hung curd / yogurt
  • 1 tbsp coriander leaves, chopped
  • 1 tbsp mint leaves, chopped
  • 4-6 green chilies, paste
  • 2 tbsp onion paste
  • 2 tbsp garlic paste
  • 2 tbsp ginger paste
  • � tsp turmeric powder
  • � tsp garam masala powder
  • 1 tsp roasted caraway seeds powder (shahi jeera)
  • 1 tsp chat masala powder
  • salt to taste
  • 2 tbsp white oil
  • juice of 1 lemon

Procedure:

  1. Beat the curd and combine the other ingredients of the marinade. Take the paneer and chopped capsicum & tomato pieces, add the marinade and mix well. Refrigerate for 30 mins.
  2. Place the marinated paneer and vegetables on the high rack on a microwave safe flat dish and grill 15-20 mins till light golden brown on all sides.
  3. Reposition the paneer and the vegetables frequently (after a gap for 3-4 mins) and brush with oil.
  4. Sprinkle a little chat masala and roasted shahi jeera powder; garnish with coriander leaves and serve with salads / chutneys.

Yellow is the color of sunshine and associated with joy, happiness, intellect and energy. Yellow produces a warming effect, arouses cheerfulness, stimulates mental activity and is often associated with food. I love the particular colour of this dish.

Sending this to FIC-Favourite guest hosted by Sweath, event started by Sunshinemom...This paneer dish is also going to to My Favourite Things-Cheese and Think Spice-Think Caraway Seeds guest hosted by Sathya of Appetite Treats

Friday, May 15, 2009

Pol Sambol

The dehydrated shredded flesh of coconut, known as desiccated coconut is often used as a substitute to grated coconut in food preparations like curries, cakes, sweets and chutneys. Desiccated coconut powder can be obtained by drying ground / shredded coconut kernel after the removal of brown testa.

Sri Lankans love their food to be hot & spicy. Pol (coconut) Sambol is another favourite dish prepared from desiccated / grated coconuts mixed with chillies.

I wrote about SriLankan traditional rice recipe (Kiribath) in my earlier post, which I served with Pol Sambol. Here is the recipe...
Ingredients:
  • 2 cups desiccated coconut / grated fresh coconut
  • 2-3 tbsp hot milk
  • 1 tsp salt
  • 1 medium lime / 2 tsp lemon juice (to taste)
To grind:
  • 2 small onions, finely chopped
  • 1 clove garlic
  • 1 small green chillies, finely sliced
  • 2 tsp dried shrimp powder
  • 1-2 tsp red chilli powder
  • 1 tsp black pepper powder
Procedure:
  1. Grind all ingredients as mentioned in �to grind� to form a coarse mixture.
  2. Take the desiccated coconut in a bowl, add the milk and mix well. Add the blended spices on top. Mix well with hand so that the coconut is evenly coated with the spices.
  3. Add salt and lemon juice. Mix well.
  4. Transfer into a serving bowl. Garnish with chopped chillies & coriander leaves and serve with rice & curries.

This is my second entry to AWED-Srilanka event, guest hosted by Siri of Siri's Corner, event started by DK...Check out my first entry for the event, click here.

Kiribath

SriLankan cuisine mainly consists of boiled / steamed rice served with curry. A popular rice dish in every SriLankan household is Kiribath. Kiribath (milk rice), is a traditional Sri Lankan dish prepared by cooking rice with coconut milk. In the Sinhala language, kiri means "milk" and bath means "rice".
More on Kiribath: Kiribath is an essential dish for any auspicious moment. It is very commonly served for breakfast on the first day of each month and is a very important aspect for the Sinhalese in celebrating the Sinhala and Tamil New Year. Kiribath is cooked and served as the first meal after the dawn of the new year.

The recipe for Kiribath is very simple. After the rice is cooked in boiling water for about 10-15 mins, the coconut milk is added and cooked again until the liquid is absorbed. Often other ingredients like sesame seeds / cashew are added. Kiribath is usually served with Lunumiris (a mixture of red onions and spices). It is also consumed with jaggery and bananas. On the Sinhala and Tamil New Year or other special occasions, it is served alongside traditional sweets like 'Kevum', 'Kokis' and 'Athirasa'.
The common & standard method of serving Kiribath is placing it on a flat plate and leveling the top and sides. Then it is cut into diamond shaped pieces
(Source: Wikipedia)

Ingredients:

  • 2 cups short grain white rice
  • 3 cups water
  • 2-1/2 cups coconut milk
  • 2 tsp salt (to taste)
  • 1" stick cinnamon

Procedure:

  1. Soak and wash rice. Put rice and water into a pan / handi and bring to the boil. When the water starts to boil, reduce flame, cover and cook over medium heat for 15 minutes.
  2. Add coconut milk, salt and cinnamon, stir well with a wooden ladle.
  3. Cover pan and simmer on low heat for further 10-15 minutes, when all the coconut milk should be absorbed.
  4. Remove cinnamon, slightly cool the rice and transfer to a flat plate.
  5. Mark off in diamond shapes (with a knife / wooden ladle) and serve with coconut sambol (I'll state the recipe in the next post).
Sending this traditional SriLankan rice recipe to AWED-Srilanka guest hosted by Siri of Siri's Corner, event started by DK...

Thursday, May 14, 2009

Doi Boda / Dahi Vada

Dahi vada (also known as thayir vada in Tamil and perugu gari in Telugu, mosaru vade in Kannada and Doi Boda in Bengali) is an Indian chaat, prepared by soaking vadas in thick yogurt (dahi / doi).
It is a great starter or can be served as a cold appetizer, prepared from lentil (black gram / urad dal) based fried balls soaked in yogurt mixture and sprinkled with spices like chilli powder, roasted cumin powder, chaat masala, rock salt (kala namak), grated coconut, chopped coriander leaves and often served with tamarind chutney.
The hot deep fried vadas are first put in water and then transferred to thick beaten yogurt. For best results, soak the vadas for at least a couple of hours before serving.

Here is my version of preparing Doi Boda...

Ingredients:

  • 1 1/2 cups black Urad Daal without skin (black lentils)
  • 3 cups curd / dahi / yoghurt (ensure that curd is not too sour)
  • water (to make curd mixture)
  • 1 1/2 tsp sugar
  • 2" piece of ginger grated
  • 2-3 green chillies (to taste), finely chopped
  • salt to taste
  • 1-2 tsp red chilli powder (to taste)
  • 1 tbsp chaat masala (to taste)
  • 2 tbsp roasted cumin seeds powder
  • white oil, for deep frying the vadas
  • chopped coriander leaves to garnish
  • tamarind chutney
  • green (dhania-pudina chutney)
Procedure:

  1. Soak the urad daal in a bowl with enough water for 12 hours (preferably overnight). Drain water and combine the soaked lentil with grated ginger, green chillies and a pinch of salt and grind it into a course paste (add a little water, but ensure not to add too much of water).
  2. Beat the ground lentil batter well for quite sometime to a thick lentil batter.
  3. Combine curd / yogurt, water, salt, sugar and a pinch of red chili powder, chaat masala, roasted cumin seeds powder and mix well to form a smooth yogurt mixture. Keep aside.
  4. Heat oil in a deep-bottomed kadhai,
  5. Grease your palms with a little oil and put a ladle of lentil batter and form a round shape.
  6. Carefully make an impression in the middle by inserting your fingers to form a vada in the shape of doughnut.
  7. Slide each vada into the hot oil, deep fry on medium flame till light golden.
  8. Remove these deep fried bodas (vadas), drain excess oil and transfer them into a bowl of luke warm water and place them in it for 5-10 mins. Remove and gently press between your palms to squeeze out the excess water. Keep aside.
  9. Finish making vadas with the rest of the remaining batter in the above mentioned process (repeat from step 5-8).
  10. Arrange the soaked vadas in a serving platter, pour the curd / yogurt mixture evenly over them to cover the vadas completely. Chill in the refrigerator for 1-2 hours before serving.
  11. To serve, put 1 or 2 Dahi Vadas in a plate, sprinkle chaat masala and garnish with bhujiya / sev, chopped coriander leaves and tamarind chutney and green chutney.
Tips: It�s best to serve with the spices and chutneys separately so that one can help himself as per taste and preference.

Sending this to the Sunday Snacks - Chaats/Indian Street Food event, hosted by Pallavi of All Things Yummy!

Monday, May 11, 2009

Egg Foo Young

An omelette / Omelet is a preparation of beaten egg often served folded with fillings like cheese, vegetables, meat or some combination of the above.
To obtain a fluffy texture, whole eggs or egg whites are usually beaten with a small amount of milk / cream, or even water (the bubbles of water are what make the omelette light and fluffy). Traditionally, omelettes are partially cooked on the top side and not flipped prior to folding.

Egg foo young / egg fooyung is an omelette dish found in American Chinese cuisine. The name comes from the Cantonese language, and may be related to the Fu Yong flower, Hibiscus mutabilis.
Generally this dish is prepared with beaten eggs, chopped vegetables and minced meat (pork, shrimp & chicken). The classic Egg Foo Young recipe stated using cooked ham, I modified the recipe by adding milk and more vegetables like capsicum & tomatoes and using shredded chicken (I had some leftover chicken pieces) instead of ham.

Ingredients:

  • 4 eggs
  • � cup milk
  • � cup cooked chicken, shredded
  • � cup bean sprouts1 medium onion, finely chopped
  • 1 small tomato, finely chopped
  • 1 small capsicum, finely chopped
  • 1 clove garlic, minced
  • 2 spring (green) onions / scallions, finely chopped
  • 1 bunch fresh coriander leaves, finely chopped
  • 1 tbsp cornstarch
  • 1 tbsp soya sauce
  • salt (to taste)
  • 1/2 tsp pepper powder / crushed pepper
  • 2 tbsp vegetable oil
  • tomato sauce (to serve)

Procedure:

  1. Beat the eggs with a little salt and milk to ensure that there are no lumps. Keep aside.
  2. Rinse bean sprouts in cold water.
  3. To stir fry the main ingredients, heat oil in a non-sick pan; add the bean sprouts and chopped vegetables (spring onions, onion, capsicum, tomatoes). Saute and stir fry in medium-high heat until the vegetables are tender.
  4. Add the minced garlic and stir fry (ensure not to burn the garlic). Add cornstarch, soya sauce, shredded chicken, salt & pepper. Mix well. Remove from flame, transfer to a dish and keep aside. Allow to cool.
  5. Cook the eggs in batches to get a layering effect. In a pan, heat a little oil and put � portion of the beaten egg mixture. Spread to coat the pan evenly. Add � portion of the stir-fried ingredients on the top.
  6. Let it set for a while. Add the rest portion of the beaten eggs mixture and top with the final set of the fried ingredients.
  7. Cover and let it set for a while. Carefully flip over to the other side and fry until light golden brown on both sides (do not fry too much or else the colour will be deep brown).
  8. Transfer on a plate, fold in half and serve hot with tomato sauce / ketchup

This is going to the Blog your Omelet event, hosted by Nuria...


Also sending another one from my archive, Pizza Omelette (a modification on Spanish omelette, a favouite of my son as it looks like a pizza) to the event..

Saturday, May 9, 2009

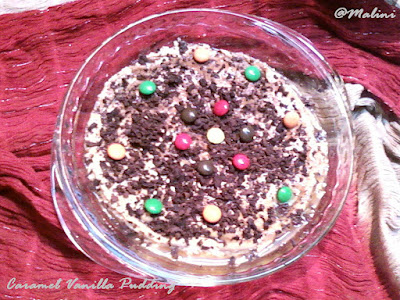
Caramel Pudding

Caramel pudding is a continental dessert and also a much loved dish all over India, specially in the Western India....It can be steamed in a pressure cooker or baked in the oven.
Stating the recipe (serves 4) as done in a pressure cooker. Though I had to prepare quite a number of times before serving a perfect & set caramel pudding......

Ingredients:
  • 500 ml full cream milk
  • 5 tbsp sugar (ratio is 500 ml milk : 5 tbsp sugar : 3 eggs)
  • 2 tbsp cornflour
  • 3 eggs
  • 1 tsp vanilla essence
  • pinch of salt (optional)
  • chocolate shavings, whipped cream (for garnishing)

Caramel coating

  • 2 tsp sugar
  • 2-3 tsp water

Procedure:

  1. Take a bowl, add cornflour and 2 tbsp cold milk. Mix well to remove lumps.
  2. Boiling milk: Put a pan, add milk and sugar. Bring to a boil by stirring continuously until all the sugar is dissolved.
  3. Just when the milk starts to boil, simmer and add the cornflour-milk mixture, immediately stir and mix well.
  4. Now alternatively increase the flame and simmer for few more mins, until the milk is thickened. Keep aside to cool.
  5. Making the caramel coating: Heat sugar and water in the pudding mould till the sugar melts & caramelized to golden brown. Swirl to coat the sides of the mould. Keep aside to cool.
  6. Eggs & milk mixture: Break the eggs separately, put in a blender, add vanilla essence and a pinch of salt and blend to form a smooth & frothy mixture. Check and ensure whether the milk is properly cooled (otherwise the whole mixture may curdle) and then add to the blender. Blend once again to a smooth milk and egg mixture.
  7. Putting in the mould: Pour this mixture into the caramelized pudding mould (fill upto � of the mould)
  8. Steaming: Take a pressure cooker, place a pressure cooker ring and pour water very carefully into the pressure cooker to ensure water is about 2" below the rim of the mould.
    Place the pudding mould on the ring and cover the mould (so that water do not enter into the pudding mould).
  9. Cover the cooker and let the steam escape. When the steam starts to escape, check watch and steam for 15-20 mins. Check whether the pudding is ready or not (insert a fork / toothpick inside the pudding, if it comes out clean, pudding is done or else steam for another 10 mins)
  10. After the requisite time, switch of gas, carefully remove the pudding mould so as not to disturb the pudding. Keep aside to cool and then chill in the refrigerator for 1-2 hours.
  11. Serve: To serve, carefully run the edge of a knife around the border of the mould. Place a plate over the pudding mould, hold firmly in place and turn over gently.
  12. The pudding will turn over onto the plate, caramel side up. Serve with caramel sauce, chocolate shavings or whipped cream.

I learnt this recipe from my mother-in-law who happens not only to be great cook but also and an encouraing person always in search of new recipes and experimenting on dishes to turn them to a new recipe.

This is going to Mom's Most Favourite Recipe Event by Shama of Easy2cook Recipes.

Also going to Celebrating Mother's Day, event hosted by Ivy of Kopiaste.. to Greek Hospitality.

Sending another pudding, steamed chocolate pudding to both the events.

Papdi Chaat

Chaat is a type of mouth watering and popular roadside snack all over India, sold by street hawker in food cartss. These days there are specialized �chaat� shops� The word chaat means to taste (to lick) as the Chaat dishes make you lick your plates clean, hence the name�They are so yummy that just by thinking about them makes my mouth water!
Traditionally, chaats are served which may vary from region-to-region and also vary as per taste of the people (us of course!!!)�But if you are making them at home, you can let your imagination turn wild and prepare a chaat recipe as per your liking with as many ingredients available at hand�

If you do not have time to make Papdi, you can always buy ready made packets of Papdi (papri) from the Bhujiwala (Mithai Shops).
Papdi Chaat, is made of crispy wafers garnished with a delicious combination of potatoes, tomatoes, chickpeas, yogurt and flavored with spices and red & green chutneys.


Ingredients:
Papdi: (Use a pack of 250 gms ready made papdi if are unable to prepare papdi at home)
  • 1-� cup all purpose flour (maida or plain flour)
  • � tsp thymol (ajwain) seeds
  • A pinch of baking powder
  • 1 tbsp oil (to knead dough)
  • � tsp salt
  • � cup lukewarm water (as required)
  • white oil, for deep frying

Other Ingredients:

  • 2 medium sized potato, boiled & cut into small pieces
  • 2 small tomatoes, finely chopped
  • � cup chickpeas, boiled
  • 2 besan dhokla, crumbled
  • 2-3 cups sour curd / yogurt (whipped)
  • 1 tsp rock salt (to taste)
  • 1-2 tsp roasted cumin seed powder
  • 1 tsp red chili powder (to taste)
  • green chillies (optional)
  • bhujiya (as per taste)
  • dhania (cilantro / fresh coriander leaves) chutney
  • tamarind (imli / tentul) chutney

Procedure:

Papdi:

  1. In a bowl mix flour, ajwain, baking powder, salt and oil. Add the water a little at a time while kneading until it forms a firm dough
  2. Cover the dough and set aside for approx 30 mins. Divide the dough into balls. Add a little oil on the rolling board and roll out a big circle. Prick with a fork / toothpick all over (to emnsure papdi do not puff while frying). Make impression with a glass or any circular cutter (cover of jam bottles). You will get about 4-5 circular papdi at one go.
  3. Take out the rolled out dough carefully and place on a plate. Repeat with the rest of the dough.
  4. Heat the oil in a frying pan on medium heat. (It should not be too hot or else papdi will not be crisp, to check whether the oil is ready or not, put a small piece of dough in the oil. The dough should sizzle and come up to the surface slowly. If the dough rises immediately, lower the flame, let the oil cool slightly and try again).
  5. Release the papdis in small bathches and fry slowly, flip and turn continuously to both sides are a light golden-brown.
  6. Remove fried papdi with a perforated ladle, transfer to a plate and soak the excess oil in a tissue paper. Continue cooking the remaining papdi in batches.
  7. After the papdi cool to room temperature they should be crisp. (You can store the papdis in airtight containers for about 1 month and use as required).

Garnish:

  1. Beat the yogurt with a little salt (Add a little water, if required). Keep aside.
  2. Arrange the papdi on a large plate. Now add the rest of the ingredients one by one on the papdis.
  3. Apply the beaten curd / yogurt and cover the papdis. Add dhania and tamarind chutney. Add bhuiya, chopped coriander leaves.
  4. Sprinkle roasted cumin powder, red chili powder and little rock salt as per your taste.
  5. Serve immediately to taste the crisp papdi chaat.

Tips:

  • It will be quite nice, if you serve all the ingredients separately in small bowls, for the people to help themselves according to their taste and liking�
  • You can even name the chaat as per your choice with mix and match of the ingredients like dahi papdi (adding more of dahi to the papdis), channa tikki chaat (adding more of roasted channa / chickpeas)�..
Sending this to the Sunday Snacks - Chaats/Indian Street Food event, hosted by Pallavi of All Things Yummy!

Thursday, May 7, 2009

Chocolate Ice-cream Milk Shake

A Milkshake is a sweet, cold beverage which is made from milk, ice cream / iced milk and sweet flavorings like fruit syrup / chocolate sauce and sometimes served with whipped cream for a richer taste. Milkshakes are usually served in a tall glass. 3 popular milkshake flavors being vanilla, chocolate and strawberry.

Here is a simple version of chocolate & ice-cream milkshake, with ready & available ingredients at home. Believe me, you will just wait and watch your kids finish this delectable drink during the summer time and even asking for more�

Ingredients:
  • 3 - 4 tsp chocolate syrup
  • 4 scoops vanilla ice cream
  • 2 cups chilled milk
  • crushed ice / Ice cubes

Proedure:

  • Place ingredients into a blender, cover and blend the ingredients on high until ice cream is dissolved and you have reached the desired consistency (Add three parts ice cream for every one part milk for a thick shake).
  • Pour into tall serving glasses and serve with crushed ice / ice cubes, whipped cream or shavings of chocolate on the froth. Enjoy!

Tips:

  • If you do not have access to an electric blender, you can combine the ingredients by hand and whisk quickly to combine and create froth or use a shaker, put the ingredients, close the cover and shake hard to form the delightful froth on top.
  • Decide how thick you want your shake to be. More milk will yield thinner shake.
  • Use melted chocolate for a delish rich chocolate milkshake.

Sending this to the "Summer activities and ideas event" @Bloggermoms. Join me in sending your recipes & ideas. Click here for details...


Here are some of the other beverages for the event....

Watermelon Cooler

Honey, Lime and Mint Iced Tea

Pina Colada Smoothie

Aam Pora Shorbot

Chocolate Ice-cream Milk Shake is also going to 15 mins cooking, event by Mahimaa....

Sooji Halwa

Sooji (Semolina) halwa is a sweet dish, usually made with wheat semolina, sugar / honey and ghee / vegetable oil. Raisins (kishmish), dates (khajur), or other dried fruits (cashewnuts, pistachios & almonds) are often added to the halva.
The classic proportions of semolina halwa are 1:2:3:4, i.e. 1 part fat (ghee / vegetable oil), 2 parts semolina, 3 parts sweetening agent (sugar / honey) and 4 parts of water.

Though you can always modify as per your taste, like increasing the sugar a little, if you like your halwa extra sweet.
In Bengali Cuisine, there is another version of sooji halwa known as mohan bhog (i.e. prasad offered to lord krishna), where milk is used instead of water. I prepare this halwa by mixing both recipes for a delicious texture & taste.

Well some informaion on Semolina and Halwa....

Semolina is the purified middlings of Durum wheat, used for breakfast cereals and puddings.Semolina, is known as Suji in North India, Sooji in Eastern India and Rava / Ravey in South India. Semolina is known as Irmik and Sameed in Arabic.

Halwa (Halawa / halva / helwa / halvah) refers to many types of sweet confection, across the Middle East, Central Asia, South Asia, the Balkans and the Jewish World. Halwa based on semolina is popular in Pakistan, Iran, Turkey, Somalia, India, and Afghanistan. Another common type of halwa is based on tahini (sesame paste), is popular in the eastern Mediterranean and Balkan regions.

Ingredients:

  • 1 cup (100 gms) semolina / sooji
  • 1-� cups (150 gms) powdered sugar
  • � cup (50 ml) milk
  • 2 tsp green cardamom powder
  • 2-3 tbsp raisins / kishmish (soaked in water)
  • 2-3 tbsp cashewnuts / kaju, halved
  • 1 bay leaf
  • 4 tbsp white oil
  • 2 tbsp ghee
  • 3-� cups (350 ml) water

Procedure:

  1. Sieve the semolina and keep aside. Heat white oil & 2 tbsp of ghee in a non-stick kadhai.
  2. Add bay leaf and the semolina. Fry the semolina on low flame, stirring continuously until the semolina starts changing colour to light golden brown.
  3. Add the powdered sugar and mix well. Fry till the semolina starts to take a darker shade than golden brown (keep stirring continuously). (frying will take about 15 mins).
  4. Add half a portion of raisins & cashew nuts. Add milk and immediately stir (or else the mixture will solidify and stick to the kadhai).
  5. Add water and mix well. Bring to a boil and reduce the flame. Simmer and cook for 10 mins or until the water is absorbed and the halwa is thickened.
  6. Add 1 tsp of green cardamom and rest of the ghee, stir and mix well. Switch off the gas.
  7. Keep the halwa in the kadhai for 5 mins. Transfer to a serving bowl. Garnish with the rest of the dry fruits and sprinkle green cardamom powder on the top of the halwa.
  8. Serve hot or cold.

Tips:

  • Dry Fruits can be added or removed according to your own choice
  • You can either use water or milk or milk-water mixture as per your preference.

The whole world will be celebrating Mother's Day on 10th of May. Sharing this dish with everyone on the occassion of mother's day coz this is one of my mother's best dishes and as she had a tremendous liking for sweet dish / desserts. I learnt this recipe from her but in due course modified a little and she even likes this version of sooji halwa.

My mother is a loveable person and a great cook. I learnt a lot of authentic Bengali dishes including some recipes from Bihar as she is born & brought up in Katrasgarh, Bihar (now Jharkhand). She lent a silent support to me & my brother in everything we did in my life and still continuing in doing so....Love you Maa, proud to be the person I am today against all odds....

This special dish is goint to Celebrating Mother's Day, a wonderful event hosted by Ivy of Kopiaste.. to Greek Hospitality.
This is also going to Mom's Most Favourite Recipe Event by Shama of Easy2cook Recipes.
Also going to the Mithai Mela, hosted by Srivalli of Cooking for all seasons...

Wednesday, May 6, 2009

Motichur ke Ladoo

Motichoor laddu / Boondi laddu is a sweet Indian delicacy made from grilled gram flour flakes (boondis) which are sweetened, mixed with dried fruits, pressed into balls and fried in ghee. Motichur Laddos are generally used in auspiciuous / traditional occassions like weddings, engagements, births etc.
It gets the name Motichoor Laddoo (Moti means bead / pearl in Hindi) / Boondi Laddu (drops / droplets are known as Boond in Hindi)

Ingredients:

  • 500 gms besan (gram flour)
  • 1/3 cup (60 ml) milk
  • 500 gms sugar
  • 500 ml water
  • 1 tbsp pistachios (pesta), finely chopped
  • 1 tbsp cashewnuts (kaju), finely chopped
  • 1 tbsp raisins (kishmish)
  • 2 tsp green cardamom (chhoti elaichi) powder
  • 2-3 drops of orange-yellow food colour
  • ghee for frying

Procedure:

  1. Sieve besan. Add 2 tbsp of ghee, food colour, milk and just enough water to form a smooth batter (ensure that there are no lumps).
  2. Make a thick batter (check consistency by dropping batter to a bowl, if its poring easily, add little besan and if its taking more time, add a little water).
  3. Heat ghee on a medium flame in a kadhai. Reduce the flame and hold a fine sieve (perforated ladle) over the kadhai and pour a ladle of batter on the sieve.
  4. Gently press the all the batter through the sieve into the hot ghee (this should look like tiny boondis).
  5. Fry the boondis till light golden brown. Drain, remove and keep aside (do not overfry or else boondis will be too crispy).
  6. Prepare sugar syrup by boiling the sugar in water till all the sugar gets dissolved and the syrup is thick (one-thread consistency). Remove the scum from the sugar syrup.
  7. Immediately add the boondis into sugar syrup. Add cardamom powder, raisins and chopped pistachios & cashewnuts and mix well. Keep for 10 mins.
  8. Slightly allow the mixture to cool. Grease your palms with ghee, shape the syrup soaked boondis into round motichur laddoos by pressing gently but firmly.
  9. Allow to cool to room temperature and serve.
This is going to the Mithai Mela, hosted by Srivalli of Cooking for all seasons...Congratulations Srivalli for completing 2 years of blogging......

Monday, May 4, 2009

Dhania ki Chutney

Cilantro is a herb with wide delicate lacy green leaves and a pungent flavor. The seed of the cilantro plant is known as coriander. Although cilantro and coriander come from the same plant, their flavors are different and cannot be substituted for each other. (Some countries refer to the cilantro as coriander, so whenever any references to "fresh coriander" or "coriander leaves" are made, it is referred to as cilantro)

Fresh coriander leaves (dhania patta / cilantro) is one of the most commonly and widely used herb in Indian Kitchen. An all time favourite for garnishing and enhance the visual appeal of a dish. They are used as seasoning in curries, salads & soups and also a must have accompaniment for snacks including chappatis / paranthas.

My mother used to make this green chutney and serve with snacks�She used to add roasted peanuts / bhujiya / ganthia and make this chutney in sil � nora (grinding stone to grind spices to have that authentic taste). I make this chutney in a blender these days....

Ingredients:

  • 2-3 bunch fresh coriander leaves / cilantro
  • 2 green chillies
  • 2 flakes of garlic
  • 2 tsp sugar
  • salt to taste
  • 1 tsp lemon juice (to taste)
  • 2-3 tbsp ganthia / chanachur
  • a little water

Procedure:

  1. Wash and clean fresh coriander leaves. Put all the ingredients (except lemon juice) in a blnder and blend to form a puree.
  2. Strain and add lemon juice. Mix well. Adjust salt and sugar as per your taste.
This is going to JFI-Cilantro event hosted by Cilantro, JFI started by Indira of Mahanandi

Aam Daal

Aam Daal (Lentil cooked with raw mango) a perfect dish to relish in summer time....Raw mango is cooked along with daal, which gives the dish a unique tangy taste. A simple dish with a few ingredients........
While browsing I came found varieties of aam daal, but found this recipe (as posted by Sandeepa) very similar to the one I make at home...


Ingredients:
  • � cup (100 gms) masoor daal (split orange / red lentils)
  • 1 raw mango (kancha aam), peeled & finely chopped
  • 1-2 cups water (as required)
  • � tsp mustard seeds
  • � tsp turmeric powder
  • 2 tbsp sugar (as required)
  • salt to taste
  • 1 tbsp mustard oil

Procedure:

  1. Wash and soak the masoor daal for 10-15 mins. Pressure cook daal with turmeric, a pinch of salt and enough water till 2-3 whistles. Remove from fire, let the cooker come down to normal temp. Pour daal in a bowl and keep aside.
  2. Heat oil in a kadhai. Add mustard seeds and let them splutter.
  3. Add the chopped mango slices, saute a little. Add the boiled masoor daal and mix well. Cover and cook for some time till the mangoes become tender.
  4. Bring to a boil and adjust sugar and salt. (Add a little water, if required)
  5. Remove from fire, transfer to a serving bowl and serve with steamed rice.

This is going to MBP: Mango Masti event hosted by Neha and started by Coffee of Spice Cafe ....

Also sending Aam Pora Shorbot to the event. I liked the way Rinku of Cooking in Westchester prepared her Smoky Summer Cooler.